When it comes to the JBL Charge 5, it’s more than just a speaker; it’s a marvel of upgrades compared to its predecessor, the JBL Charge 4.
This speaker not only sounds great but also offers an uncomplicated experience with its intuitive control buttons neatly organized in a row.
From an accessibility perspective, the inclusion of clear labels on the buttons enhances the aesthetic of the device.
And if you ever need guidance, the quick start guide is your trusty guide.
YOU MIGHT BE INTERESTED : JBL CHARGE 3 BUTTONS
In my experience, the JBL Charge 5 is a testament to innovation in portable audio, providing a top-notch experience that’s both user-friendly and stylish.
RELATED : JBL FLIP 4 BUTTON FUNCTIONS
RELATED : JBL CHARGE 4 BUTTON FUNCTIONS
From the moment of purchase, you’ll notice the improvements, starting with its impressive IP67 rating that ensures it’s waterproof and offers protection against dust and solids.
The real highlight lies in its features, including a built-in voice assistant for hands-free calling.
The audio quality is a treat for music enthusiasts, with a balanced sound signature, rich bass, and crisp treble thanks to the dual bass radiators and a 20mm tweeter.
Lets explore button functions in detail !
Key Takeaways
JBL Charge 5 Main Button Functions
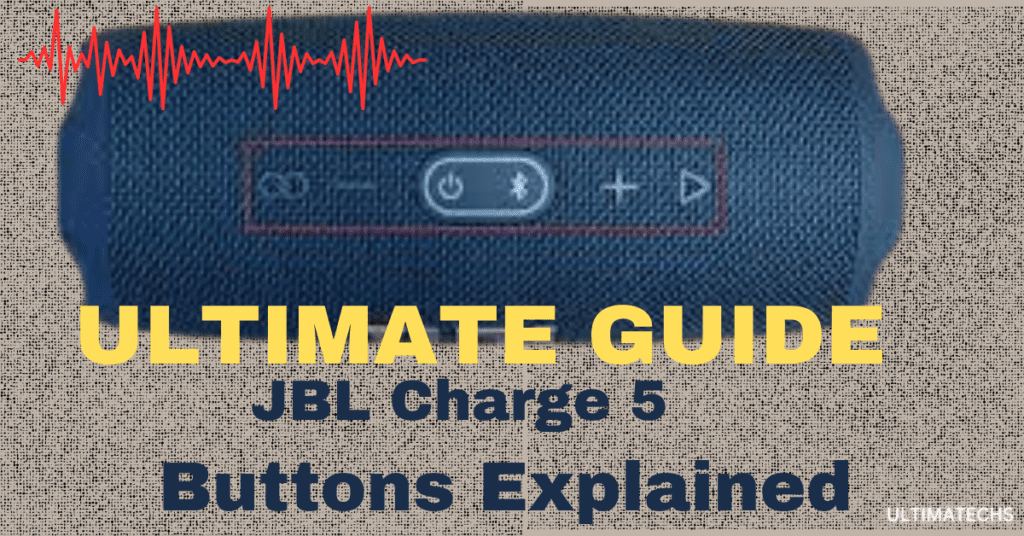
When it comes to the JBL Charge 5, you’ll notice it’s not just about the sound; it’s also about the user interface.
The top panel of the speaker showcases a unique design with six control buttons, informative lamps, and a battery gauge light strip, all adorned with distinctive icons, symbols, and embossed shapes.
Functions :JBL Charge 5 Button
Each of these buttons serves a specific function, but you won’t find their roles explicitly stated. Instead, it’s a tactile adventure where you decipher the controls through touch.
In my experience, this design choice makes the JBL Charge 5 not just user-friendly but also creates a unique and engaging interface that sets it apart in the world of portable speakers.
PartyBoost Button
On the JBL Charge 5, the PartyBoost button sits prominently on the left side, featuring an embossed infinity icon that signifies its unique function.
This small yet significant control button allows you to connect your speaker with other PartyBoost-compatible speakers, creating an amplified audio experience that can elevate any gathering.
Volume Down Button
Opposite to the PartyBoost button, you’ll find the Volume Down button, marked with a subtraction symbol. Its function is straightforward – to lower the volume level of your speaker.
With each press, you can easily step down the volume or even mute the speaker when needed, giving you precise control over your audio experience.
Whether you’re enjoying music at a moderate level or need to quickly reduce the sound, this button makes it hassle-free.
Power Button
The Power button on the JBL Charge 5 is truly multifunctional. It serves as the gateway to your music adventure, allowing you to turn the speaker on and off with a simple press.
The power icon illuminates to indicate the device’s status, creating a sense of anticipation as the speaker comes to life or gracefully shuts down after a great listening session.
Bluetooth Button
In the world of wireless speakers, the Bluetooth button is your bridge to connectivity. With the JBL Charge 5, you can effortlessly pair it with your Bluetooth-enabled phone, tablet, or other devices.
A quick press puts it in pairing mode, making it easily discoverable to your devices. This button transforms your space into a hub of sound, connecting you to your favorite music sources.
Volume Up Button
When you’re ready to elevate your audio experience, the Volume Up button is your ally. With each tap, you can increase the speaker’s volume level incrementally.
It offers 32 steps of adjustment, allowing you to find the perfect balance for your listening pleasure.
Whether you prefer a subtle background melody or a room-filling sound, this button gives you precise control
Play/Pause Button
The Play/Pause button on the JBL Charge 5 is more than a mere symbol—it’s your portal to music mastery.
This flipped triangle holds the power of playing, pausing, and skipping tracks in the palm of your hand.
Whether you’re engrossed in a call on your phone or navigating your music player, a simple tap transforms your world.
It’s the ultimate tool to stream music seamlessly, ensuring every song is at your command, and you’re always one tap away from tracking backward.
Battery Indicator & Charging Port
Right beside the power and Bluetooth buttons, you’ll find two essential features: the battery indicator and the charging port.
The battery indicator tells you how much power is left in your JBL speaker. If it turns off, simply press either the Volume Up or Volume Down button to wake it up.
To charge your speaker, just use the charger that came with your JBL 5. Plug one end into the charging port and the other end into a wall charger.
It’s that easy to keep your JBL 5 powered up and ready to go!
JBL Charge 5 Special Button Functions and Combinations
Beyond their individual prowess, the buttons on the JBL Charge 5 unite to create a symphony of possibilities.
Whether you’re troubleshooting or want to dive into pairing mode for a flawless Bluetooth connection, the combinations are your secret keys to unlocking the full potential of your speaker.
As someone who appreciates the art of control, I’ve found that these button functions and combinations on the JBL Charge 5 offer an unparalleled level of convenience and customization, turning every listening session into a harmonious experience.
Here is a breakdown of the JBL Charge 5 button functions and combinations:
Pairing Mode/Discovery Mode
In the world of the JBL Charge 5, the term “Pairing Mode” takes center stage.
This feature empowers your speaker with the magic of Bluetooth connectivity. Imagine the freedom to effortlessly stream music from your favorite devices.
Whether it’s your smartphone, tablet, or other gadgets, the Charge 5 becomes discoverable, eagerly waiting to create a musical symphony.
RELATED : CONNECT JBL SPEAKER TO IPHONE
It’s the gateway to an immersive listening journey where your devices and the Charge 5 harmonize to deliver exceptional audio.
PARTYBOOST MODE
When it comes to the JBL Charge 5, it’s all about elevating your listening experience, and PartyBoost Mode is the key to achieving that.
This mode offers a balanced sound profile that accentuates the richness of bass, creating a mini disco right in your own space.
To activate PartyBoost Mode:
- Power on your JBL speaker.
- Establish a connection between your speaker and your phone or tablet.
- Download and install the JBL Portable app available for both Android and iOS.
- Initiate PartyBoost by pressing the PartyBoost button on each speaker you wish to link.
- Await the connection, which should complete within 30 seconds.
- Launch the JBL Portable app.
- Choose Stereo Mode for split-channel sound or Party Mode to synchronize audio across all speakers.
Tip: To disconnect PartyBoost from your JBL Charge 5, simply press the PartyBoost button.
Service Mode
Service Mode on JBL Bluetooth speakers is a powerful feature that provides control over your device.
It allows you to lock and deactivate certain functions, particularly the battery-related ones, giving you a customized experience.
- Activating Service Mode:
- Power on your speaker.
- Simultaneously press the Bluetooth and Play/Pause buttons.
- Release both buttons once the speaker powers off, indicating service mode is active.
- Deactivating Service Mode:
- Connect a charger to your speaker’s charging port.
- Press the Bluetooth and Play/Pause buttons together for several seconds.
- Release the buttons when the speaker powers back on, signaling the exit from service mode.
Firmware Version Check
To ensure your JBL Charge 5 performs at its best, it’s essential to keep the Firmware Version up to date.
Upgrading to the latest version not only unlocks new features but also enhances the overall performance of your speaker.
You can easily achieve this through the JBL Portable app or by following specific button combinations. It’s a simple yet crucial step to maintain the peak performance of your speaker.
Checking Firmware Version:
Power Cycle JBL Charge 5
When your JBL Charge 5 decides to freeze or encounters a malfunction, fear not!
By holding down the POWER button, you initiate a graceful shutdown, and your speaker promptly restarts as if it just woke up from a refreshing nap.
It’s like hitting the reboot button on life’s glitches.
Reset JBL Charge 5:
Is your JBL Charge 5 not charging correctly or having trouble connecting to paired devices?
This magical action brings your speaker back to its pristine factory state, wiping away all troubles and starting anew.
As someone who appreciates the beauty of a fresh start, the Reset function on the JBL Charge 5 is like a breath of fresh air for your audio adventures.
Steps to Reset:
Frequently Asked Questions
Question: What do the buttons on the JBL Charge 5 mean?
Question: What does the infinity button on a JBL Charge 5 do?
The infinity button on your JBL Charge 5 is no ordinary symbol; it’s the PartyBoost button in disguise. It holds the power to connect your speaker with other PartyBoost-compatible speakers, creating an amplified listening experience that transforms any gathering into a party. Simply pair your phone, and the magic begins.
Question: How do you adjust the bass on a JBL Charge 5?
To adjust the bass on your JBL Charge 5, you have multiple avenues. Whether it’s the dedicated bass button, the JBL Portable app, or your phone’s equalization settings, you can fine-tune the audio to match your preferences. It’s your journey to crafting the perfect sound.
Question: What is the triangle button on my JBL Charge 5 speaker?
The triangle button is the gateway to audio control on your JBL Charge 5. It’s the Play/Pause button, and its functions are simple yet powerful. A single tap and you can play, pause, or skip tracks on your audio device, allowing you to effortlessly stream music and enjoy your favorite songs.
Question: Which buttons do I press to reset my JBL Charge 5?
When you find yourself in need of a reset, the JBL Charge 5 has you covered. By pressing specific button combinations, such as the Volume Up button and Play/Pause button, you can delete pairings, unpair devices, and even reboot your speaker. It’s the path to a fresh start for your audio adventures.
TO WRAP IT UP
In conclusion, the JBL Charge 5’s buttons offer a seamless and intuitive user experience, blending modern design with functional simplicity.
Whether managing playback, pairing with devices, or resetting to factory settings, users can rely on these buttons for a reliable and efficient interaction. Understanding and utilizing these controls is key to maximizing the enjoyment and performance of your JBL Charge 5 speaker.


Very nice article and straight to the point. I am not sure if this
is truly the best place to ask but do you people have any ideea where to employ some professional writers?
Thanks 🙂 Najlepsze escape roomy