
Hey friend! Have you just encountered the problem of JLab earbuds not charging, I feel your frustration. You’re not alone; thousands of earbud owners have been through this. I’ve been there myself,
JLab earbuds, arguably among the best budget wireless earbud options on the market, often stop charging like many other electronic devices.
Remember, encountering charging issues with earbuds is common, but with a bit of patience and the right approach, most problems can be solved.
Fortunately, I’ve spent ample time and gained insights into the common problems and causes of JLab earbuds failing to charge.
RELATED : “QUICK FIX: ONE SIDE DEAD ON BLUETOOTH EARBUDS!”
RELATED: “EARBUD ONE SIDE NOT WORKING? JLAB FIX FAST!”
The fixes I found apply generally to most JLab models, including the JBuds Air Pop and JBuds Air Go. Whether it’s about JLab Jbuds air one side not charging , right JLab earbud not charging or left JLab earbud not charging.
I have developed a comprehensive troubleshooting guide. Keep this guide handy next time your JLab earbuds decide to take an unexpected break from charging.
Key Takeaways
Top Usual Causes: What’s Stopping JLab Earbuds from Charging?
Understanding why your JLab earbuds aren’t charging is crucial to quickly resolving the issue.
Remember, these quality build earbuds might just need a bit of tinkering on your part to get them back in action.
How To Fix: JLAB Earbuds Not Charging
Here’s a quick guideline on identifying and fixing the reasons behind your JLab earbuds’ charging problems.
Remove Plastic films
If you’re encountering charging issues with your newly purchased JLab earbuds, especially the Go Air models,
This isn’t just for aesthetics; it serves a purpose – to prevent over-discharging during shipping.
The film is often inconspicuous, and it’s easy to forget about it, just as I did.
It’s a simple step that can save you from the frustration of a non-charging device.
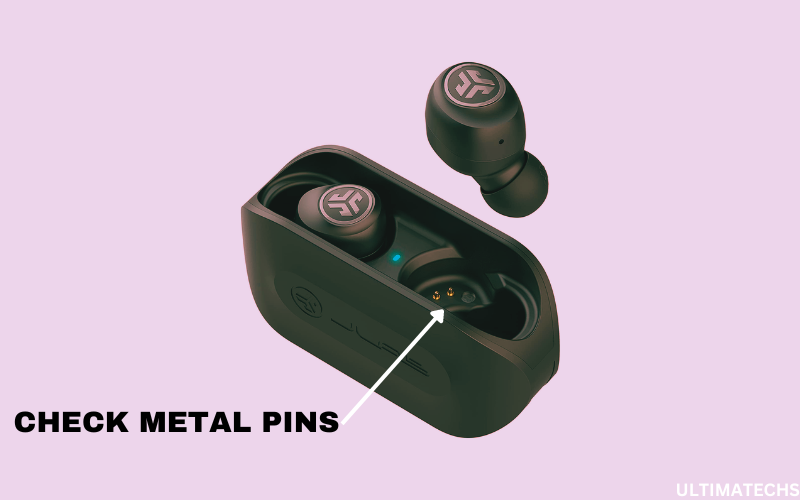
Check Pins Connection
When it comes to JLab earbuds not charging, one pivotal factor often goes unnoticed – a LOOSE CONNECTION.
These pins must align precisely with the corresponding contacts on the earbuds to supply the necessary power for a safe and efficient recharge.
Now, imagine trying to fit a key into a lock in the dark. If the key doesn’t align properly, it won’t turn, right?
.
Sometimes, even a slight adjustment can establish the connection needed to recharge the earbuds appropriately.
By paying close attention to this detail, you can often remedy a charging problem that at first seems complex but is in fact due to a simple misalignment in the charging case
Check Charging Cable
A FAULTY CHARGING CABLE can be a stealthy culprit when your JLab earbuds won’t charge.
This is a problem you might not consider at first, but it’s essential to inspect the cable you’re using.
Even if the cable fits the charging case, it might not meet the requirements necessary to effectively charge your earbuds.
Sometimes, the cable itself might be damaged. If the cable is undetachable from the earbuds, the situation becomes trickier, and you might need to open the case to determine if a solder has come loose.
If you’re not comfortable with this, it’s best to buy a replacement.
Change Charging Source
When your JLab earbuds are not charging, an effective approach is to change the charging source.
If you typically connect the charging case to a low-powered USB port on a laptop, it might not easily charge the earbuds.
In such cases, it’s a good idea to eliminate this cause by using a different, more standard USB port or a wall charging brick.
Just changing to another power source can try and often successfully resolve the charging issue.
Over-Discharged Batteries
Another common but often overlooked cause for JLab earbuds not charging is over-discharged batteries.
To solve this issue, insert the earbuds into their corresponding slots in the charging dock and allow them to recharge.
Sometimes, if they’ve been drained for too long, they might need a kick-start.
A trick I’ve learned is to use two copper wires and a 1.5V AA battery. Carefully connect the positive and negative terminals of the earbud batteries to the AA battery for a few seconds. This can sometimes recharge the over-discharged batteries.
Outdated Firmware
A lesser-known factor in JLab earbuds not charging could be OUTDATED FIRMWARE. Models like Jbuds Air, Pro, Epic Sport, and ANC often require software updates to function optimally..
To address charging problems in your JLab earbuds, it’s important to stay updated with the latest firmware.
JLab doesn’t have one app that covers all models, so you’ll need to consult the user manual to find the right app for your specific earbud type.
For instance, if you have JLab Jbuds Air Pro, you should use the JLab Sound app, whereas the Epic Air Sport, Epic Air ANC, and Jbuds Air ANC models are compatible with the JLab Air ANC app.
These updates address minor bugs and issues, including those related to charging.
To update your JLab earbuds, proceed with the following steps:
Clean Earbuds & Charging Case
A common reason your JLab earbuds might stop charging correctly is due to dirt, gunk, or wax buildup in the charging case or on the earbuds themselves.
Cleaning them can often fix these issues.
If your model is waterproof or water-resistant, you can wash the ear tips separately under running water, but make sure to let them dry naturally before reinserting them into the case.
Regular maintenance like this can keep your budget-friendly JLab earbuds in top working condition.
Physical Damaged Charging Case
When the charging case, an integral component with a primary role in keeping your earbuds charged and protecting them from external elements, becomes defective, your JLab earbuds won’t charge effectively.
Unfortunately, these cases don’t have user-serviceable parts, so if the issue isn’t repairable, spending on repairs might be less feasible than buying a new one.
You can visit the JLab website and look for compatible replacement parts for reliable charging solution.
Case Temperature
Another important yet factor is to inspect the case temperature when your JLab earbuds are not charging.
A little-known quirk of Lithium-ion batteries is their sensitivity to extreme temperatures, both high and low.
These conditions can permanently damage the chemistry of the battery cell, leading to charging issues.
JLab earbuds have built-in safety features that may disable charging if the temperature is outside the normal range.
Physical Damaged Earbuds
When troubleshooting the issue of JLab charging, a crucial step is to check for physical damage. This is a common cause for charging problems.
Inspect your earbuds for visible signs of wear and tear.
Look for cracks, bent pins, or discoloration, which could indicate excessive heat, cold, or chemicals exposure.
it’s best to contact JLabs for assistance, as physical damage can prevent the earbuds right or left side from charging properly
Bugs And Glitches
Despite being popular and affordable, JLab earbuds can encounter technical glitches, sometimes causing them to not charge.
A personalized setting might inadvertently be the root of the problem.
To reset your JLab earbuds, follow these steps:
After performing a factory reset, you’ll need to re-establish the connection between your earbuds and your phone or tablet by pairing them once more with Bluetooth.
RELATED : GET CONNECTED: FIX JLAB EARBUDS NOT PAIRING TOGETHER.
RELATED: JLAB EARBUDS: FAST PAIRING STEPS UNVEILED
Leverage JLab’s Generous Warranty
Take advantage of JLab’s generous two-year warranty. If your earbuds are still within this warranty period, don’t hesitate to initiate a warranty claim and receive a brand-new pair of JLab Go Air earbuds as a replacement.
Consider Upgrading
For older earbud models, if alternative charging troubleshooting methods prove ineffective. contemplate upgrading to a newer set as a potential solution.
Consult JLAB’S Support
When it comes to JLab earbuds not charging, you need to understand the underlying hardware issues that might be at play.
These tiny audio wonders are composed of intricate components, but their delicate nature means they can wear down over time.
If you find your JLab earbuds refusing to charge, don’t despair.
These earbuds typically don’t have user-serviceable parts, meaning you can’t tinker with them yourself. Instead, it’s time to consult JLab’s support for assistance.
This means you can receive a new pair without paying a dime for it.
- Phone: For U.S. support, call 1-405-445-7219.
- Email: support@jlab.com
- Official Website: JLAB customer support service is available 24/7.
Frequently Asked Questions
Question: Why won’t my JLab earbuds charge?
JLab earbuds sometimes fail to charge due to loose connection or improperly aligned metal pins in the charging case. Additionally, dirt and wax blockage can mimic a battery failure, causing charging issues.
Question: Will JLab earbuds charge while the case is charging?
Yes, when JLab earbuds are inserted into the case and the case is plugged into a power outlet with a USB cable, both charge simultaneously. Ensure the cable is properly connected to the USB port and an AC adapter for effective charging. The external case recharges the earbuds while it’s charging.
Question: What do I do if my JLab earbuds won’t charge?
To fix JLab earbuds that won’t charge, first check the connection. Make sure the metal pins in the charging case align correctly with the earbuds’ connectors. ‘
Remove any debris blocking the port and ensure there are no loose connections. Use an adequate and undamaged cable. If they’re still not charging, reset the earbuds to factory defaults.
Question: How do I know if JLab earbuds are charging?
To know if your JLab earbuds are charging, check the LED indicator on the case. After inserting the earbuds and closing the lid, the LEDs will blink or pulse. A white or red light will turn solid when nearing 100% charged.
Blue LEDs indicate the earbuds are docked and charging. Once fully charged, the LEDs turn off. This displays the current battery level and status.
Question: How to charge JLab earbuds?
To charge JLab earbuds, they need to be inside the charging case, which needs to be connected to a 5V USB port supplying up to 1A current.
Question: JLab earbuds won’t turn ON?
If your JLab earbuds won’t turn ON, check if they have sufficient charge by fully taking them out of the case; possible reasons include physical damage or software glitches, including outdated firmware.
TO WRAP IT UP
As you can see, fixing JLab earbuds that won’t charge is not complex. You only need to check your connections, clean your charging case, or update the firmware. You can also reset the earbuds to factory defaults to erase custom configurations that might be causing the problem. If the earbuds are faulty, consider visiting a JLab service center to redeem your warranty.
JLAB BUDS NOT CHARGING IN CASE (SOLUTION)


