JLAB has become a popular brand over the years due to its fair pricing and impressive features. Even though they come with a two-year warranty and promise of replacement, issues can still arise after they are purchased.
Recently, I faced a problem with my JLab GO Air POP. The left earbud kept disconnecting while the right one was refusing to reconnect.
At first, I tried restarting them, but the problem persisted. I changed the pair of earbuds a few times and even tested them with a different phone, but the issue remained.
RELATED : JLAB EARBUDS: FAST PAIRING STEPS UNVEILED
RELATED : JLAB EARBUDS NOT CHARGING
The situation shifted when the earbuds persistently failed to pair with any device, despite numerous restarts. After extensive online research, I finally managed to pair them with my phone
This article aims to help people who are facing similar pairing issues with their JLab GO Air POP or any other Model and struggling how to pair jlab go air earbuds together.
RELATED : “QUICK FIX: ONE SIDE DEAD ON BLUETOOTH EARBUDS!”
RELATED : “EARBUD ONE SIDE NOT WORKING? JLAB FIX FAST!”
KEY TAKEAWAYS
JLAB EARBUDS NOT PAIRING –
If JLab earbuds are not connecting together , you do not need to fret . There could be several reasons behind this issue.
Often, a little troubleshooting and patience are all it takes to resolve most pairing problems.
Troubleshooting Steps
Follow these targeted troubleshooting steps to swiftly reconnect your JLab earbuds and enjoy your music uninterrupted.
Restart and Reset Your Earbuds
Often, a simple restart can resolve pairing issues with JLab True Wireless earbuds.
This reset helps clear any system processes that might be malfunctioning.
Here is a quick guide on how to reset JLab earbuds
Manual Reset
When your JLab earbuds are not pairing properly, a manual reset can often be the key to solving this puzzle.
By doing this, the earbuds can reconnect to your source device as if they were being paired for the first time.
Remember to forget the earbuds from any Bluetooth devices they were previously connected to, ensuring a more successful pairing process.
Different models, and versions of JLab earbuds, like the JBUDS Air which has three versions, have unique resetting procedures.
You can find these detailed steps in the comprehensive user manual available on JLab’s website, particularly in the Troubleshooting section.
To identify your earbud’s version or generation, check the FCC ID at the bottom of the case. Then, on the user manual page, click the letter (i) next to your model’s name and compare the FCC IDs.
Sometimes, you might need to pair and reset a couple of times before they begin to work as expected.
The key is to do not give up – patience often pays off with technology!
Bluetooth Settings
“Forget” Your Earbuds from Your Bluetooth List
This is especially necessary if your earbuds have already paired with your source device or if there’s another pair of earbuds or headphones recently connected to it.
This simple action refreshes the connection settings, often solving the pairing issue.
It’s like giving your earbuds and the source device’s Bluetooth a fresh start, wiping the slate clean for a new pairing attempt.
This action effectively severs any lingering connections, allowing you to start the pairing process afresh, free from interference by previously connected devices.
Disable Bluetooth Of Nearby Devices
A helpful step in resolving JLab earbuds not pairing is to disable Bluetooth on nearby devices.
This can happen if that device’s Bluetooth is still enabled and within range. To prevent such a scenario, it’s crucial to ensure that Bluetooth connectivity is disabled on all devices around you.
This includes switching off and then on the Bluetooth of your intended source device. After you restart the earbuds, check if they now pair correctly.
Check Charging and Fit
A low or run out battery can significantly impact their ability to pair. To overcome this, ensure your earbuds are adequately charged.
These lights may behave differently based on the battery percentage and the specific earbuds model.
If uncertain about what the lights indicate, it’s beneficial to consult the user manual to understand what these indications mean.
Even if your earbuds have little power, they might still provide an audio prompt.
Proper Placement in Case
Ensuring that your JLab earbuds are properly placed in the charging case can often rectify pairing issues.
This can be done through the JBL Headphones app, which will help you ensure that both buds are making proper contact with the case’s charging pins.
Improper placement can prevent the earbuds from charging correctly, leading to pairing difficulties.
Clean Charging Ports
Over time, dust and debris can build up in the case’s charging port and the earbuds’ charging pins.
To resolve this, it’s essential to clean both the earbuds and the charging port of the case thoroughly, ensuring there’s no build-up on the inner parts.
Try Different Source Device
When facing pairing issues with your JLab earbuds, it’s essential to explore various solutions.
One effective approach is to try pairing your earbuds with a different device after resetting them. This step helps rule out whether the issue lies with the earbuds or the source device.
To do this, make sure that the Bluetooth on the source device where you experienced the problem is switched off, and it’s the only device with Bluetooth activated.
Then, attempt to pair your earbuds with another device. If the earbuds work correctly when connected to a different device, it suggests that the problem might be related to the initial source device.
Contact Customer Support
When your JLab earbuds refuse to pair even after applying all possible fixes, it’s a frustrating ordeal. As someone who’s navigated this maze, I’ve found that contacting customer support is a pivotal step.
Reaching out to JLab’s customer support offers a more tailored approach. From personal experience, their team is prompt to assist and offer suggestions.
After notifying them of the issues and the steps you’ve already taken, they might request additional information to provide specific help.
In instances where no more solutions are viable, JLab’s support can guide you through a warranty claim.
If your earbuds are under warranty, they’ll likely offer a replacement. Sadly, if the warranty has expired, you might need to consider purchasing a new pair.
Although it’s not ideal, sometimes starting fresh is the only way forward.
Frequently Asked Questions
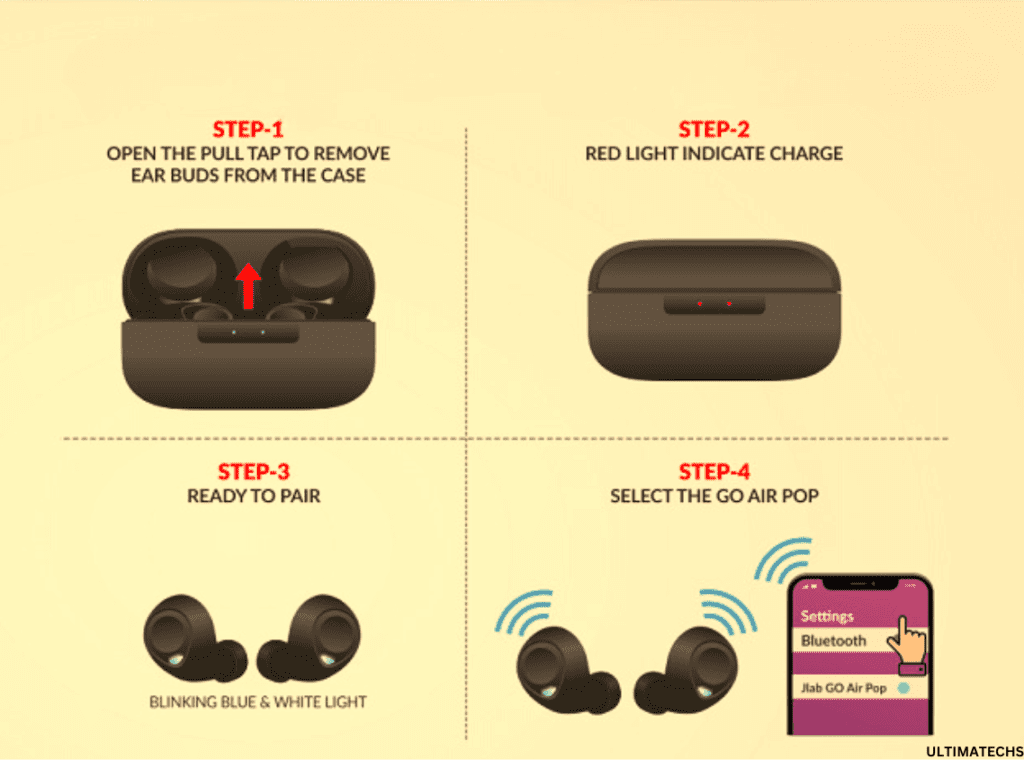
Question: How do you put JLab earbuds in pair mode?
- Entering Pairing Mode: Power on your JLab Earbuds to initiate pairing mode. Indications of this mode include one earbud flashing LED lights in blue and white, while the other maintains a solid white light.
- Switching Devices: If your earbuds are currently connected to a device but you wish to pair them with another, simply turn off Bluetooth on the currently connected device. This action will prompt your earbuds to enter pairing mode again.
- Automatic Reconnection: Be aware that your earbuds tend to automatically reconnect to the last device they were paired with, provided Bluetooth is active and the device is within range.
Question: How do I reset my JLab Bluetooth earbuds?
To reset JLab Bluetooth earbuds, especially JBUDS AIR V1 (first generation),
Question: What does flashing blue light mean on JLab earbuds?
One earbud will alternate between blue and white flashes, signaling its readiness to pair with your device via Bluetooth.
To Wrap It Up:
If you’re facing issues with your JLab earbuds not pairing, start by ensuring they’re switched on and not linked to any previous devices. Check their battery levels as insufficient power might hinder pairing. Consider a restart or reset to clear any minor glitches.
Keep in mind, interference from other devices can also disrupt the connection. If problems persist, examine the earbuds for any physical damage and don’t hesitate to reach out to customer support, especially if they’re still under warranty.


